文章目录
- spring6
- 1. 一些基本的概念、优势
- 2. 入门案例实现
- maven聚合工程创建步骤
- 分析实现过程
- 3. IoC(Inversion of Control)
- 基于xml的bean环境搭建
- 获取bean
- 获取接口创建实现类
- 依赖注入 setter注入 和 构造器注入
- 原生方式的setter注入
- 原生方式的构造器注入
- 使用bean的方式进行依赖注入步骤
- 对象类型属性赋值步骤
- 引入外部属性文件步骤
- bean的八大生命周期(重要)
- 基于xml的bean自动装配
- 基于注解的bean自动装配(极其重要)
- 使用注解创建对象
- 手动实现IoC
- 实现过程
- 手动实现一个IoC反射
- 手动实现属性注入过程
- 4. 面向切面编程
- 静态代理图解
- 静态代理术语
- 动态代理
- 动态代理的实现过程
- 概念
- 相关术语
- AOP思想综述
- 基于注解方式配置AOP
- 通知类型及其使用
- bean配置文件
- 测试文件
- 报错信息解决
- 重用切入点表达式
- 5. 单元测试
- 6. 事务
- JdbcTemplate对象操作Mysql数据库(Spring事务处理前置知识)
- 准备环境
- 利用JdbcTemplate对象完成对数据库的增加、修改、删除操作
- 利用JdbcTemplate对象完成对数据库的查询操作
- 报错信息解决
- 事务处理
- 概念
- 特性
- 声明式事务管理(基于注解实现)
- 准备环境(基于上面的JDBC示例进行添加,目录结构如下)
- BookController
- BookDao
- BookDaoImpl
- BookService
- BookServiceImpl
- TestBookTx
- 分析
- 开启事务步骤(使用注解的方式)
- 事务注解的一些属性
- Resoource资源操作
- UrlResource实现类访问url资源
- ClassPathResourceDemo访问本地资源(项目内资源)
- loadAndReadUrlResource访问磁盘内文件
- 国际化:i18n
- 数据校验
- 通过Validator接口实现数据校验
- 基于注解校验
- 基于方法校验
- 自定义校验
- AOT
导语:感觉自己记得可能不全,所以我找了一篇优秀的笔记
(双手)奉上链接:https://lixx.cn/archives/spring6-2
https://lixx.cn/categories/spring6
spring6_6">spring6
1. 一些基本的概念、优势
主流,轻量级、开源 框架
广义划分:以SpringFirework为核心的Spring技术栈
狭义划分:专指SpringFireWork
两大核心:Ioc和AOP
特点:
- 非侵入式:功能组件使用注解进行标记,简洁。
- 控制反转:自动创建对象,让我们享受资源注入。
- 面向切面编程:在不修改源代码的基础上增强代码功能。
- 组件化:拆分复杂应用为多个组件共同实现
- 一站式:在集合许多依赖
2. 入门案例实现
maven聚合工程创建步骤

- 引入spring相关依赖
<dependencies>
    <!--引入spring-context依赖-->
    <dependency>
        <groupId>org.springframework</groupId>
        <artifactId>spring-context</artifactId>
        <version>6.1.10</version>
    </dependency>

    <!--测试依赖:junit-->
    <dependency>
        <groupId>org.junit.jupiter</groupId>
        <artifactId>junit-jupiter-api</artifactId>
        <version>5.10.2</version>
    </dependency>
</dependencies>
- 创建类,定义属性和方法
package com.itchen.spring6;

public class User {
    public void add(){
        System.out.println("add ...");
    }

    public static void main(String[] args) {
        User user = new User();
        user.add();
    }
}
-
按照spring要求创建一个配置文件.xml
-
在配置文件中创建相应的配置信息
<?xml version="1.0" encoding="UTF-8"?>
<!--下面是一些对标签的约束-->
<beans xmlns="http://www.springframework.org/schema/beans"
       xmlns:xsi="http://www.w3.org/2001/XMLSchema-instance"
       xsi:schemaLocation="http://www.springframework.org/schema/beans http://www.springframework.org/schema/beans/spring-beans.xsd">

    <!--
        完成对User对象的创建
        id属性:唯一标识 (为了方便一般使用类的首字母小写)
        class:要创建的类的对象的全路径(包名称 + 类名称)
    -->
    <bean id="user" class="com.itchen.spring6.User"></bean>
</beans>
- 最终测试
package com.itchen.spring6;

import org.junit.jupiter.api.Test;
import org.springframework.context.ApplicationContext;
import org.springframework.context.support.ClassPathXmlApplicationContext;

public class TestUser {
    @Test
    public void testUserObject(){
        // 加载spring配置文件,对象创建
        ApplicationContext context = new ClassPathXmlApplicationContext("bean.xml");
        // 获取创建的对象
        User user = (User)context.getBean("user");
        System.out.println(user);
        // 使用对象的调用方法进行测试
        user.add();
    }
}
- 输出了user对象的全路径和user的地址
分析实现过程
- 执行了实体类的无参数构造方法
- 如何返回创建的对象
- 加载bean.xml配置文件
- 对xml文件进行解析操作
- 获取标签的属性值
- 使用反射根据类的全路径创建对象
- 对象存放在项目的一个Map集合中;格式<key,value>
3. IoC(Inversion of Control)
Spring通过loC容器来管理所有Java对象的实例化和初始化,控制对象与对象之间的依赖关系。我们将由loC容器管理的Java对象称为Spring Bean,它与使用关键字new创建的Java对象没有任何区别。
将对象的创建和对象与对象的关系都交给了容器进行管理。
基于xml的bean环境搭建
- 将子模块pom文件中的依赖放在父模块中(子模块依然可以调用相应的依赖)
- 创建资源文件(.xml)和java实体类
获取bean
- 实体类user.java
package com.itchen.spring6.iocxml;

public class User {
    private String name;
    private Integer age;
    public void run(){
        System.out.println("run ...");
    }
}
- bean资源文件获取
- 注意:此时的class类型的bean只能有一个
<?xml version="1.0" encoding="UTF-8"?>
<beans xmlns="http://www.springframework.org/schema/beans"
       xmlns:xsi="http://www.w3.org/2001/XMLSchema-instance"
       xsi:schemaLocation="http://www.springframework.org/schema/beans http://www.springframework.org/schema/beans/spring-beans.xsd">
    <bean id="user" class="com.itchen.spring6.iocxml.User"></bean>
</beans>
- 测试获取bean的三种方式
package com.itchen.spring6.iocxml;

import org.springframework.context.ApplicationContext;
import org.springframework.context.support.ClassPathXmlApplicationContext;

public class TestUser {
    public static void main(String[] args) {
        ApplicationContext context = new ClassPathXmlApplicationContext("bean.xml");
        // 根据对象获取bean
        User user = (User)context.getBean("user");
        System.out.println("根据id获取bean:" + user);
        // 根据类型获取bean
        User user2 = (User)context.getBean(User.class);
        System.out.println("根据类型获取bean:" + user2);

        // 根据id和类型获取bean
        User user3 = (User)context.getBean("user", User.class);
        System.out.println("根据id和类型获取bean:" + user3);
    }
}
获取接口创建实现类
- 创建接口,声明需要实现的方法;在实体类中实现接口。
- 在bean.xml中配置相应的impl实现类
<bean id="USerDaoImpl" class="com.itchen.spring6.iocxml.bean.USerDaoImpl"></bean>
注意:这里的bean必须是唯一的。一个接口只能由一个impl实体类来实现
依赖注入 setter注入 和 构造器注入
原生方式的setter注入
先在类中定义基本的set和get方法,然后在其他类中创建类的对象,调用其setget方法来传值。
原生方式的构造器注入
先定义基本的有参构造器和无参构造器,然后在创建对象的时候在构造器中传入相对应的值。
使用bean的方式进行依赖注入步骤
- 创建一个类,在其中定义基本属性,生成set方法
- 在spring中进行配置
<bean id="book" class="com.itchen.spring6.iocxml.di.Book">
    <property name="bname" value="java后端开发"></property>
    <property name="author" value="陈志伟"></property>
</bean>
- 测试
@Test
public void testSetter(){
    // 1. 加载配置文件
    ApplicationContext context = new ClassPathXmlApplicationContext("bean-di.xml");
    Book book = context.getBean("book", Book.class);
    System.out.println(book);
}
or
- 创建类,定义属性,生成有参数的构造方法
- 进行配置
<bean id="BookConstructor" class="com.itchen.spring6.iocxml.di.Book">
    <constructor-arg name="bname" value="前端开发"></constructor-arg>
    <constructor-arg name="author" value="陈志伟"></constructor-arg>
</bean>
- 测试
注意:setter注入调用的是无参构造方法,而构造器注入调用的是有参构造方法
对象类型属性赋值步骤
- 准备工作:创建两个类(班和学生),学生中定义班的对象。定义其中的构造方法、和get、set方法
- 创建bean.xml(名字任意)
<!--第一种方式:引入外部bean的方式-->
<bean id="class" class="com.itchen.spring6.iocxml.ditest.Class">
    <property name="cname" value="241班"></property>
</bean>
<bean id="student" class="com.itchen.spring6.iocxml.ditest.Student">
    <property name="sname" value="Aim"></property>
    <property name="age" value="22"></property>
    <property name="cls" ref="class"></property>
</bean>
<!--第二种方式:引入内部bean的方式-->
<bean id="student2" class="com.itchen.spring6.iocxml.ditest.Student">
    <property name="sname" value="Mary"></property>
    <property name="age" value="20"></property>
    <!--内部bean-->
    <property name="cls">
        <bean id="class2" class="com.itchen.spring6.iocxml.ditest.Class">
            <property name="cname" value="242班"></property>
        </bean>
    </property>
</bean>
<!--第三种方式:级联属性赋值-->
<bean id="cls3" class="com.itchen.spring6.iocxml.ditest.Class">
        <property name="cname" value="144班"></property>
    </bean>
    <bean id="student3" class="com.itchen.spring6.iocxml.ditest.Student">
        <property name="sname" value="Tom"></property>
        <property name="age" value="28"></property>
        <property name="cls" ref="class"></property>
        <!--级联再赋值-->
        <property name="cls.cname" value="141班"></property>
    </bean>
<!--第四种方式:数组注入-->
<!--注入数组类型的属性-->
<bean id="clss" class="com.itchen.spring6.iocxml.ditest.Class">
    <property name="cname" value="143班"></property>
</bean>
<bean id="student" class="com.itchen.spring6.iocxml.ditest.Student">
    <!--普通-->
    <property name="sname" value="Aim"></property>
    <property name="age" value="22"></property>
    <!--对象-->
    <property name="cls" ref="clss"></property>
    <!--数组-->
    <property name="loves">
        <array>
            <value>吃饭</value>
            <value>睡觉</value>
            <value>玩jj</value>
        </array>
    </property>
</bean>
<!--第五种方式:集合类型属性的注入-->
<bean id="studen1" class="com.itchen.spring6.iocxml.ditest.Student">
    <property name="sname" value="Aim"></property>
    <property name="age" value="19"></property>
</bean>
<bean id="studen2" class="com.itchen.spring6.iocxml.ditest.Student">
    <property name="sname" value="Mary"></property>
    <property name="age" value="19"></property>
</bean>
<bean id="studen3" class="com.itchen.spring6.iocxml.ditest.Student">
    <property name="sname" value="Tom"></property>
    <property name="age" value="19"></property>
</bean>
<bean id="cls" class="com.itchen.spring6.iocxml.ditest.Class">
    <property name="cname" value="142班"></property>
    <property name="stuList">
        <list>
            <ref bean="studen1"></ref>
            <ref bean="studen2"></ref>
            <ref bean="studen3"></ref>
        </list>
    </property>
</bean>
注意:因为这里的包含关系变了,需要修改一下测试方法
public static void main(String[] args) {
    ApplicationContext context = new ClassPathXmlApplicationContext("bean-diarr.xml");

    // 学生的对象
    Student stu = context.getBean("student",Student.class);
    stu.work();
}
<!--第六种方式:map类型属性注入-->
<!--
    1. 创建两个对象:用bean标签进行配置
    2. 注入它的普通类型的属性
    3. 在学生的bean中注入map集合的属性
-->
<bean id="teacher" class="com.itchen.spring6.iocxml.dimap.Teacher">
    <property name="tid" value="1000"></property>
    <property name="tname" value="小李"></property>
</bean>
<bean id="student" class="com.itchen.spring6.iocxml.dimap.Student">
    <property name="sid" value="2000"></property>
    <property name="sname" value="小明"></property>
    <property name="teacherMap">
        <map>
            <entry>
                <key>
                    <value>10010</value>
                </key>
                <!--这里的(键值对的值)值如果是一个普通的值,可以使用value-->
                <ref bean="teacher"></ref>
            </entry>
        </map>
    </property>
</bean>
<!--第七种方式:集合类型的属性注入-->
<!--
    1. 创建三个对象
    2. 注入普通类型的属性
    3. 使用“util:类型” 定义
    4. 在学生bean中引入3.的bean
-->

<bean id="student" class="com.itchen.spring6.iocxml.dimap.Student">
    <property name="sid" value="10000"></property>
    <property name="sname" value="张三"></property>
    <!--注入list和map类型属性-->
    <property name="lessonList" ref="lessonList"></property>
    <property name="teacherMap" ref="teacherMap"></property>
</bean>

<util:list id="lessonList">
    <ref bean="lesson1"></ref>
    <ref bean="lesson2"></ref>
</util:list>
<util:map id="teacherMap">
    <entry>
        <key>
            <value>10010</value>
        </key>
        <ref bean="teacher1"></ref>
    </entry>
    <entry>
        <key>
            <value>10086</value>
        </key>
        <ref bean="teacher2"></ref>
    </entry>
</util:map>

<bean id="lesson1" class="com.itchen.spring6.iocxml.dimap.Lesson">
    <property name="lessonName" value="java开发"></property>
</bean>
<bean id="lesson2" class="com.itchen.spring6.iocxml.dimap.Lesson">
    <property name="lessonName" value="前端开发"></property>
</bean>

<bean id="teacher1" class="com.itchen.spring6.iocxml.dimap.Teacher">
    <property name="tname" value="西门庆"></property>
    <property name="tid" value="1000"></property>
</bean>
<bean id="teacher2" class="com.itchen.spring6.iocxml.dimap.Teacher">
    <property name="tname" value="欧阳弧"></property>
    <property name="tid" value="2000"></property>
</bean>
注意:第七种方式在使用的时候需要引入标签相应的命名空间
<?xml version="1.0" encoding="UTF-8"?>
<beans xmlns="http://www.springframework.org/schema/beans"
    xmlns:xsi="http://www.w3.org/2001/XMLSchema-instance"
    xmlns:util="http://www.springframework.org/schema/util"
    xsi:schemaLocation="http://www.springframework.org/schema/util
    http://www.springframework.org/schema/util/spring-util.xsd
    http://www.springframework.org/schema/beans
    http://www.springframework.org/schema/beans/spring-beans.xsd">
引入外部属性文件步骤
- 引入外部属性文件的相关依赖【pom文件】
- 创建一个外部的属性文件。定义数据信息:用户名、密码、地址。【.properties文件】
- 创建spring的配置文件,引入context的命名空间。引入属性文件,使用表达式完成注入。
<!--引入外部文件 完成数据库的信息注入-->
<bean id="druidDataSource" class="com.alibaba.druid.pool.DruidDataSource">
    <property name="url" value="${jdbc.url}"></property>
    <property name="username" value="${jdbc.user}"></property>
    <property name="password" value="${jdbc.password}"></property>
    <property name="driverClassName" value="${jdbc.driver}"></property>
</bean>
bean的八大生命周期(重要)
可以在配置文件中【bean.xml文件】使用参数的形式制定bean对象的初始化函数和销毁函数。
- bean对象的创建(调用无参构造方法)
- 给bean对象设置相关属性
- bean后置处理器(初始化之前)
- bean对象初始化(调用制定的初始化方法)
- bean后置处理器(初始化之后)
- bean对象创建完成了,可以使用了
- bean对象销毁(配置制定的销毁方法)
- IoC容器关闭
基于xml的bean自动装配
<!--根据类型自动装配-->
<bean id="userController" class="com.itchen.spring6.iocxml.auto.Controller.UserController" autowire="byType"></bean>
<bean id="userService" class="com.itchen.spring6.iocxml.auto.Service.UserServiceImpl" autowire="byType"></bean>
<bean id="userDao" class="com.itchen.spring6.iocxml.auto.dao.UserDaoImpl" autowire="byType"></bean>
<!--根据名称自动装配-->
<bean id="userController" class="com.itchen.spring6.iocxml.auto.Controller.UserController" autowire="byName"></bean>
<bean id="userService" class="com.itchen.spring6.iocxml.auto.Service.UserServiceImpl" autowire="byName"></bean>
<bean id="userDao" class="com.itchen.spring6.iocxml.auto.dao.UserDaoImpl" autowire="byName"></bean>
<!--这时需要保证类的名字和id的名字一模一样-->
基于注解的bean自动装配(极其重要)
使用注解创建对象
- 引入依赖
- 开启组件扫描
<context:component-scan base-package="com.itchen.spring6"></context:component-scan>
- 被扫描的类用
@component修饰;自动注入的属性用@Autowired修饰;使用注解定义bean
| 注解 | 说明 |
|---|---|
| @Component | 该注解用于描述 Spring 中的 Bean,它是一个泛化的概念,仅仅表示容器中的一个组件(Bean),并且可以作用在应用的任何层次,例如 Service 层、Dao 层等。 使用时只需将该注解标注在相应类上即可。 |
| @Repository | 该注解用于将数据访问层(Dao 层)的类标识为 Spring 中的 Bean,其功能与 @Component 相同。 |
| @Service | 该注解通常作用在业务层(Service 层),用于将业务层的类标识为 Spring 中的 Bean,其功能与 @Component 相同。 |
| @Controller | 该注解通常作用在控制层(如SpringMVC 的 Controller),用于将控制层的类标识为 Spring 中的 Bean,其功能与 @Component 相同。 |
手动实现IoC
主要使用java的反射机制和注解进行实现
实现过程
- 创建子模块
- 创建测试类
- 创建两个注解
- 约定注解@Bean @Di
- 创建bean容器的接口ApplicationContext,定义方法,返回对象
- 实现bean的容器接口
- 返回对象
- 根据包的规则加载bean(设置包的扫描规则)
手动实现一个IoC反射
loadBean步骤:
// 1. 判断当前是否是文件夹
// 2. 获取文件夹里面的所有内容
// 3. 文件夹里面为空,直接返回
// 4. 如果文件夹里面不为空
// 遍历得到的每个file对象 重复3. 4.// 5. 如果是文件,得到包路径 + 类名称
// 6. 判断文件是否是.class类型,如果是,则去掉后缀
// 7. 如果有@Bean注解使用反射实例化
// 将实例化结果放入map集合中
package com.itchen.bean;

import com.itchen.annotation.Bean;

import java.io.File;
import java.io.IOException;
import java.net.URL;
import java.net.URLDecoder;
import java.util.Enumeration;
import java.util.HashMap;
import java.util.Map;

public class AnnotationApplicationContext implements ApplicationContext{
    // 创建map集合用于创建bean的实例对象
    private static Map<Class,Object> beanFactory = new HashMap<>();
    private static String rootPath;

    // 返回对象
    @Override
    public Object getBean(Class clazz) {
        return beanFactory.get(clazz);
    }

    // 设置包的扫描规则

    // 创建有参构造,传递包路径
    public static void pathDemo1(String basePackage){
        // 把点替换为反斜杠
        String packagePath = basePackage.replaceAll("\\.", "\\\\");

        // 获取包的绝对路径
        try {
            Enumeration<URL> dirs = Thread.currentThread().getContextClassLoader().getResources(packagePath);
            while(dirs.hasMoreElements()){
                URL url = dirs.nextElement();
                String filePath = URLDecoder.decode(url.getFile(), "utf-8");
                rootPath = filePath.substring(0, filePath.length() - packagePath.length());
                System.out.println(filePath);

                loadBean(new File(filePath));
            }
        } catch (IOException e) {
            throw new RuntimeException(e);
        } catch (ClassNotFoundException e) {
            throw new RuntimeException(e);
        }
    }

    // 包扫描过程,实例化bean
    private static void loadBean(File fileParent) throws ClassNotFoundException {
        // 1. 判断当前是否是文件夹
        if (fileParent.isDirectory()) {
            // 2. 获取文件夹里面的所有内容
            File[] childrenFiles = fileParent.listFiles();
            // 3. 文件夹里面为空,直接返回
            if (childrenFiles == null || childrenFiles.length == 0) {
                return;
            }
            // 4. 如果文件夹里面不为空
            // 遍历得到的每个file对象  重复3. 4.
            for (File child : childrenFiles) {
                if (child.isDirectory()) {
                    loadBean(child);
                } else {
                    // 5. 如果是文件,得到包路径 + 类名称
                    String pathWithClass = child.getAbsolutePath().substring(rootPath.length() - 1);
                    // 6. 判断文件是否是.class类型,如果是,则去掉后缀
                    String fullName = pathWithClass.replaceAll("\\\\", ".").replace(".class", "");
                    try {
                        Class<?> aClass = Class.forName(fullName);
                        // 7. 如果有@Bean注解使用反射实例化
                        if (!aClass.isInterface()) {
                            Bean annotation = aClass.getAnnotation(Bean.class);
                            if (annotation != null) {
                                Object instance = aClass.newInstance();
                                if (aClass.getInterfaces().length > 0) {
                                    System.out.println("正在加载【" + aClass.getInterfaces()[0] + "】,实例对象是:" + instance.getClass().getName());
                                    beanFactory.put(aClass.getInterfaces()[0], instance);
                                } else {
                                    System.out.println("正在加载【" + aClass.getName() + "】,实例对象是:" + instance.getClass().getName());
                                    beanFactory.put(aClass, instance);
                                }
                            }
                        }
                        // 将实例化结果放入map集合中
                    }catch (Exception e){
                        e.printStackTrace();
                    }
                }
            }
        }
    }
}
手动实现属性注入过程
// 1. 实例化对象在beanFactory的map集合里面
// 遍历map集合

// 2. 获取所有的value值,获取每个对象的属性

// 3. 遍历对象属性的数组,得到每个属性

// 4. 判断是否有@Di注解

// 5. 如果有,将对象注入
package com.itchen.bean;

import com.itchen.annotation.Bean;
import com.itchen.annotation.Di;
import com.itchen.bean.ApplicationContext;

import java.io.File;
import java.lang.reflect.Field;
import java.net.URL;
import java.net.URLDecoder;
import java.util.Enumeration;
import java.util.HashMap;
import java.util.Map;

public class AnnotationApplicationContext implements ApplicationContext {

    //存储bean的容器
    private HashMap<Class, Object> beanFactory = new HashMap<>();
    private static String rootPath;

    @Override
    public Object getBean(Class clazz) {
        return beanFactory.get(clazz);
    }

    /**
     * 根据包扫描加载bean
     * @param basePackage
     */
    public AnnotationApplicationContext(String basePackage) {
        try {
            String packageDirName = basePackage.replaceAll("\\.", "\\\\");
            Enumeration<URL> dirs =Thread.currentThread().getContextClassLoader().getResources(packageDirName);
            while (dirs.hasMoreElements()) {
                URL url = dirs.nextElement();
                String filePath = URLDecoder.decode(url.getFile(),"utf-8");
                rootPath = filePath.substring(0, filePath.length()-packageDirName.length());
                loadBean(new File(filePath));
            }

        } catch (Exception e) {
            throw new RuntimeException(e);
        }

        // 属性的注入
        loadDi();
    }

    private  void loadBean(File fileParent) {
        if (fileParent.isDirectory()) {
            File[] childrenFiles = fileParent.listFiles();
            if(childrenFiles == null || childrenFiles.length == 0){
                return;
            }
            for (File child : childrenFiles) {
                if (child.isDirectory()) {
                    //如果是个文件夹就继续调用该方法,使用了递归
                    loadBean(child);
                } else {
                    //通过文件路径转变成全类名,第一步把绝对路径部分去掉
                    String pathWithClass = child.getAbsolutePath().substring(rootPath.length() - 1);
                    //选中class文件
                    if (pathWithClass.contains(".class")) {
                        //    com.xinzhi.dao.UserDao
                        //去掉.class后缀,并且把 \ 替换成 .
                        String fullName = pathWithClass.replaceAll("\\\\", ".").replace(".class", "");
                        try {
                            Class<?> aClass = Class.forName(fullName);
                            //把非接口的类实例化放在map中
                            if(!aClass.isInterface()){
                                Bean annotation = aClass.getAnnotation(Bean.class);
                                if(annotation != null){
                                    Object instance = aClass.newInstance();
                                    //判断一下有没有接口
                                    if(aClass.getInterfaces().length > 0) {
                                        //如果有接口把接口的class当成key,实例对象当成value
                                        System.out.println("正在加载【"+ aClass.getInterfaces()[0] +"】,实例对象是:" + instance.getClass().getName());
                                        beanFactory.put(aClass.getInterfaces()[0], instance);
                                    }else{
                                        //如果有接口把自己的class当成key,实例对象当成value
                                        System.out.println("正在加载【"+ aClass.getName() +"】,实例对象是:" + instance.getClass().getName());
                                        beanFactory.put(aClass, instance);
                                    }
                                }
                            }
                        } catch (ClassNotFoundException | IllegalAccessException | InstantiationException e) {
                            e.printStackTrace();
                        }
                    }
                }
            }
        }
    }
    // 属性注入
    private void loadDi() {
        for(Map.Entry<Class,Object> entry : beanFactory.entrySet()){
            //就是咱们放在容器的对象
            Object obj = entry.getValue();
            Class<?> aClass = obj.getClass();
            Field[] declaredFields = aClass.getDeclaredFields();
            for (Field field : declaredFields){
                Di annotation = field.getAnnotation(Di.class);
                if( annotation != null ){
                    field.setAccessible(true);
                    try {
                        System.out.println("正在给【"+obj.getClass().getName()+"】属性【" + field.getName() + "】注入值【"+ beanFactory.get(field.getType()).getClass().getName() +"】");
                        field.set(obj,beanFactory.get(field.getType()));
                    } catch (IllegalAccessException e) {
                        e.printStackTrace();
                    }
                }
            }
        }
    }
}
4. 面向切面编程
核心业务+任务日志 – > 代码冗余
解决:用代理模式将其分离(分离任务日志) ----------------- 解耦
静态代理图解


静态代理术语
代理:将非核心代码分离出来后,封装这些非逻辑代理、对象、方法
目标:被代理套用的非核心代码类、对象、方法
动态代理
原因:因为静态代理不具备代码的灵活性,所以引入了动态代理
动态代理的实现过程
package com.itchen.spring6.aop.example;

import java.lang.reflect.InvocationHandler;
import java.lang.reflect.Method;
import java.lang.reflect.Proxy;
import java.util.Arrays;

public class ProxyFactory {

    // 目标对象
    private Object target;
    public ProxyFactory(Object obj){
        target = obj;
    }

    // 返回代理对象的方法
    public Object getProxy(){

        /**
         * 参数1. 类加载器
         * 参数2. 目标对象实现的所有接口
         * 参数3. 设置代理修改目标函数的方法
         * */
        ClassLoader classLoader = target.getClass().getClassLoader();
        Class<?>[] interfaces = target.getClass().getInterfaces();
        InvocationHandler invocationHandler = new InvocationHandler(){
            @Override
            /**
             * 参数1. 代理对象
             * 参数2. 需要重写目标对象中的方法啊
             * 参数3. 目标方法中的参数
             * */
            public Object invoke(Object proxy, Method method, Object[] args) throws Throwable {
                System.out.println("[动态代理][日志] "+method.getName()+",参数:"+ Arrays.toString(args));
                Object result = method.invoke(target, args);
                System.out.println("[动态代理][日志] "+method.getName()+",结果:"+ result);
                return result;
            }
        };

        return Proxy.newProxyInstance(classLoader,interfaces,invocationHandler);
    }
}
自行补充计算器的基类和计算器接口类
// 测试类
package com.itchen.spring6.aop.example;

public class TestCaculator {
    public static void main(String[] args) {
        // 1. 创建代理对象
        ProxyFactory proxyFactory = new ProxyFactory(new CalculatorImpl());
        Calculator proxy = (Calculator) proxyFactory.getProxy();

        proxy.add(1,2);
        proxy.mul(2,4);
    }
}
概念
AOP(Aspect Oriented Programming)是一种设计思想,是软件设计领域中的面向切面编程,它是面向对象编程的一种补充和完善,它以通过预编译方式和运行期动态代理方式实现,在不修改源代码的情况下,给程序动态统一添加额外功能的一种技术。利用AOP可以对业务逻辑的各个部分进行隔离,从而使得业务逻辑各部分之间的耦合度降低,提高程序的可重用性,同时提高了开发的效率。
相关术语
- 横切关注点
- 项目中相同的需要被提取的部分
- 通知(增强)
- 需要增加的功能
- 通知方法:横切关注点的实现
- 通知类型:五种
- 切面 > 通知
- 封装通知方法的类(eg. 一个切面类包含:前置通知、返回通知、后置通知等)
- 目标
- 被代理的对象
- 代理
- 向目标对象应用通知后创建代理对象
- 连接点
- 能使用通知的地方
- 切入点
- 实际去增强方法的位置
AOP思想综述
将特定的代码封装到切面类中,将切面类用于一个新的目标方法,最终实现 方法的增强(方法的增强好抽象呀)
基于注解方式配置AOP
通知类型及其使用
package com.itchen.spring6.aop.annoaop;

import org.aspectj.lang.JoinPoint;
import org.aspectj.lang.ProceedingJoinPoint;
import org.aspectj.lang.annotation.*;
import org.springframework.stereotype.Component;

import java.util.Arrays;


@Aspect // 切面类
@Component // 在spring的ioc容器中进行管理
public class LogAspect {
    // 设置切入点和通知类型
    @Before(value = "pointCut()")
    public void beforeMethod(JoinPoint joinPoint){
        String methodName = joinPoint.getSignature().getName();
        String args = Arrays.toString(joinPoint.getArgs());
        System.out.println("Logger-->前置通知,方法名:"+methodName+",参数:"+args);
    }

    @After("execution(* com.itchen.spring6.aop.annoaop.CalculatorImpl.*(..))")
    public void afterMethod(JoinPoint joinPoint){
        String methodName = joinPoint.getSignature().getName();
        System.out.println("Logger-->后置通知,方法名:"+methodName);
    }

    @AfterReturning(value = "execution(* com.itchen.spring6.aop.annoaop.CalculatorImpl.*(..))", returning = "result")
    public void afterReturningMethod(JoinPoint joinPoint, Object result){
        String methodName = joinPoint.getSignature().getName();
        System.out.println("Logger-->返回通知,方法名:"+methodName+",结果:"+result);
    }

    @AfterThrowing(value = "execution(* com.itchen.spring6.aop.annoaop.CalculatorImpl.*(..))", throwing = "ex")
    public void afterThrowingMethod(JoinPoint joinPoint, Throwable ex){
        String methodName = joinPoint.getSignature().getName();
        System.out.println("Logger-->异常通知,方法名:"+methodName+",异常:"+ex);
    }

    @Around("execution(* com.itchen.spring6.aop.annoaop.CalculatorImpl.*(..))")
    public Object aroundMethod(ProceedingJoinPoint joinPoint){
        String methodName = joinPoint.getSignature().getName();
        String args = Arrays.toString(joinPoint.getArgs());
        Object result = null;
        try {
            System.out.println("环绕通知-->目标对象方法执行之前");
            //目标对象(连接点)方法的执行
            result = joinPoint.proceed();
            System.out.println("环绕通知-->目标对象方法返回值之后");
        } catch (Throwable throwable) {
            throwable.printStackTrace();
            System.out.println("环绕通知-->目标对象方法出现异常时");
        } finally {
            System.out.println("环绕通知-->目标对象方法执行完毕");
        }
        return result;
    }

    // 重用切入点表达式

    @Pointcut(value = "execution(* com.itchen.spring6.aop.annoaop.CalculatorImpl.*(..))")
    public void pointCut(){}
}
bean配置文件
<?xml version="1.0" encoding="UTF-8"?>
<beans xmlns="http://www.springframework.org/schema/beans"
       xmlns:xsi="http://www.w3.org/2001/XMLSchema-instance"
       xmlns:context="http://www.springframework.org/schema/context"
       xmlns:aop="http://www.springframework.org/schema/aop"
       xsi:schemaLocation="http://www.springframework.org/schema/beans
       http://www.springframework.org/schema/beans/spring-beans.xsd
       http://www.springframework.org/schema/context
       http://www.springframework.org/schema/context/spring-context.xsd
       http://www.springframework.org/schema/aop
       http://www.springframework.org/schema/aop/spring-aop.xsd">

    <!--开启组件的扫描-->
    <context:component-scan base-package="com.itchen.spring6.aop.annoaop"></context:component-scan>

    <!--开启自动代理-->
    <aop:aspectj-autoproxy />
</beans>
测试文件
package com.itchen.spring6.aop.annoaop;

import org.junit.jupiter.api.Test;
import org.springframework.context.ApplicationContext;
import org.springframework.context.support.ClassPathXmlApplicationContext;

public class TestAop {
    @Test
    public void testAdd(){
        ApplicationContext context = new ClassPathXmlApplicationContext("bean.xml");
        Calculator calculator = context.getBean(Calculator.class);
        calculator.add(1,1);
    }
}
报错信息解决
NoSuchBeanDefinitionException:没有在实现类中加入@Component注解创建bean
重用切入点表达式
通知注解后面的参数重复书写,所以可以用注解将参数定义为一个类似宏的东西
5. 单元测试
Junit依赖自动注入方便测试
整合Junit5 和 Junit4
// 不整合的时候测试
public class TestUser {
    public static void main(String[] args) {
        ApplicationContext context = new ClassPathXmlApplicationContext("bean-auto.xml");
        UserController userController = context.getBean("userController", UserController.class);
        userController.addUser();
    }
}
// 整合Junit5
@SpringJUnitConfig(locations = "classpath:bean.xml")
public class SpringTestJunit5 {

    @Autowired
    private User user;

    // 测试方法
    @Test
    public void testUser(){
        System.out.println(user);
        user.run();
    }
}
// 整合Junit4
@RunWith(SpringJUnit4ClassRunner.class)
@ContextConfiguration("classpath:bean.xml")
public class SpringTestJunit4 {
    @Autowired
    private User user;

    @Test
    public void testUser4(){
        System.out.println(user);
        user.run();
    }
}
6. 事务
JdbcTemplate对象操作Mysql数据库(Spring事务处理前置知识)
准备环境
- 导入依赖
<!--spring jdbc  Spring 持久化层支持jar包-->
<dependency>
    <groupId>org.springframework</groupId>
    <artifactId>spring-jdbc</artifactId>
    <version>6.0.2</version>
</dependency>
<!-- MySQL驱动 -->
<dependency>
    <groupId>mysql</groupId>
    <artifactId>mysql-connector-java</artifactId>
    <version>8.0.30</version>
</dependency>
<!-- 数据源 -->
<dependency>
    <groupId>com.alibaba</groupId>
    <artifactId>druid</artifactId>
    <version>1.2.15</version>
</dependency>
<!--spring对junit的支持相关依赖-->
<dependency>
    <groupId>org.springframework</groupId>
    <artifactId>spring-test</artifactId>
    <version>6.0.2</version>
</dependency>

<!--junit5测试-->
<dependency>
    <groupId>org.junit.jupiter</groupId>
    <artifactId>junit-jupiter-api</artifactId>
    <version>5.9.0</version>
</dependency>
- 配置jdbc.properties配置文件连接数据库
jdbc.user=root
jdbc.password=root
jdbc.url=jdbc:mysql://localhost:3306/spring?characterEncoding=utf8&useSSL=false
jdbc.driver=com.mysql.cj.jdbc.Driver
- 配置bean.xml配置JdbcTemplate
<?xml version="1.0" encoding="UTF-8"?>
<beans xmlns="http://www.springframework.org/schema/beans"
       xmlns:xsi="http://www.w3.org/2001/XMLSchema-instance"
       xmlns:context="http://www.springframework.org/schema/context"
       xsi:schemaLocation="http://www.springframework.org/schema/beans
       http://www.springframework.org/schema/beans/spring-beans.xsd
       http://www.springframework.org/schema/context
       http://www.springframework.org/schema/context/spring-context.xsd">

    <!-- 导入外部属性文件 -->
    <context:property-placeholder location="classpath:jdbc.properties" />

    <!-- 配置数据源 -->
    <bean id="druidDataSource" class="com.alibaba.druid.pool.DruidDataSource">
        <property name="url" value="${jdbc.url}"/>
        <property name="driverClassName" value="${jdbc.driver}"/>
        <property name="username" value="${jdbc.user}"/>
        <property name="password" value="${jdbc.password}"/>
    </bean>

    <!-- 配置 JdbcTemplate -->
    <bean id="jdbcTemplate" class="org.springframework.jdbc.core.JdbcTemplate">
        <!-- 装配数据源 -->
        <property name="dataSource" ref="druidDataSource"/>
    </bean>
</beans>
利用JdbcTemplate对象完成对数据库的增加、修改、删除操作
测试代码
package com.itchen.spring6.jdbc;

import org.junit.jupiter.api.Test;
import org.springframework.beans.factory.annotation.Autowired;
import org.springframework.jdbc.core.JdbcTemplate;
import org.springframework.test.context.junit.jupiter.SpringJUnitConfig;

@SpringJUnitConfig(locations = "classpath:beans.xml")
public class JdbcTemplateTest {
   @Autowired
   private JdbcTemplate jdbcTemplate;
   // 添加、修改、删除操作
   @Test
   public void testUpdate(){
       // 添加数据
       String sql = "insert into t_emp values(null,?,?,?)";
       Object[] params = {"洛萨",32,"男"};
//        添加数据
//        int rows = jdbcTemplate.update(sql,params);
//        System.out.println("影响了" + rows + "行");
       String sql2 = "update t_emp set name=? where id=?";
       // 修改id为?行数据的名字字段
//        int row = jdbcTemplate.update(sql2,"666",3);
//        System.out.println("影响了" + row + "行");
       // 删除id为?的一行
       String sql3 = "delete from t_emp where id=?";
//        int row3 = jdbcTemplate.update(sql3,3);
//        System.out.println("影响了" + row3 + "行");
   }
}
利用JdbcTemplate对象完成对数据库的查询操作
package com.itchen.spring6.jdbc;

import org.junit.jupiter.api.Test;
import org.springframework.beans.factory.annotation.Autowired;
import org.springframework.jdbc.core.BeanPropertyRowMapper;
import org.springframework.jdbc.core.JdbcTemplate;
import org.springframework.jdbc.core.RowMapper;
import org.springframework.test.context.junit.jupiter.SpringJUnitConfig;

import java.util.List;

@SpringJUnitConfig(locations = "classpath:beans.xml")
public class jdbcTemplateTest2 {
    @Autowired
    private JdbcTemplate jdbcTemplate;


    /**
     * queryForObject
     * */
    // 查询并获取数据库的第一行数据
    @Test
    public void testSelectObject1(){
        String sql = "select * from t_emp where id=?";

        Emp person = jdbcTemplate.queryForObject(sql, (rs, rowNum) -> {
            Emp emp = new Emp();
            emp.setId(rs.getInt("id"));
            emp.setName(rs.getString("name"));
            emp.setAge(rs.getInt("age"));
            emp.setSex(rs.getString("sex"));
            return emp;
        }, 1);

        System.out.println(person);
    }


    /**
     * queryForObject
     * */
    @Test
    public void testSelectObject2(){
        String sql = "select * from t_emp where id=?";
        // 利用BeanPropertyRowMapper方法自动创建对象接收数据库数据
        Emp emp = jdbcTemplate.queryForObject(sql, new BeanPropertyRowMapper<>(Emp.class),2);
        System.out.println(emp);
    }

    /**
     * query
     * */
    @Test
    public void testSelectList(){
        String sql = "select * from t_emp";
        List<Emp> list = jdbcTemplate.query(sql, new BeanPropertyRowMapper<>(Emp.class));
        System.out.println(list);
    }

    /**
     * queryForObject
     * */
    //查询单行单列的值
    @Test
    public void selectCount(){
        String sql = "select count(id) from t_emp";
        Integer count = jdbcTemplate.queryForObject(sql, Integer.class);
        System.out.println(count);
    }
}
报错信息解决
BadSqlGrammarException:没有按照规定的sql语法进行传递参数信息
事务处理
概念
eg.银行转账,要成功都成功;要失败,都失败
特性
原子性:要成功,都成功
一致性:操作前和操作后总量一致
隔离性:多个事务进行操作,对各个事务之间没有影响
持久性:提交就永久保存
声明式事务管理(基于注解实现)
准备环境(基于上面的JDBC示例进行添加,目录结构如下)
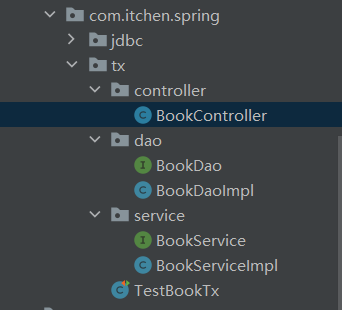
BookController
package com.itchen.spring.tx.controller;

import com.itchen.spring.tx.service.BookService;
import org.springframework.beans.factory.annotation.Autowired;
import org.springframework.stereotype.Controller;

@Controller
public class BookController {
    @Autowired
    private BookService bookService;

    // 买书的方法: 图书的id  、  用户的id
    public void buyBook(Integer bookId,Integer userId){
        // 调用Service方法
        bookService.buyBook(bookId,userId);
    }
}
BookDao
package com.itchen.spring.tx.dao;

public interface BookDao {
    Integer getBookPriceByBookId(Integer bookId);

    void updateStock(Integer bookId);

    void updateUserBalance(Integer userId,Integer price);
}
BookDaoImpl
package com.itchen.spring.tx.dao;

import org.springframework.beans.factory.annotation.Autowired;
import org.springframework.jdbc.core.JdbcTemplate;
import org.springframework.stereotype.Repository;

@Repository
public class BookDaoImpl implements BookDao{

    @Autowired
    private JdbcTemplate jdbcTemplate;
    Integer price;
    @Override
    public Integer getBookPriceByBookId(Integer bookId) {
        String sql = "select price from t_book where book_id=?";
        price = jdbcTemplate.queryForObject(sql, Integer.class, bookId);
        return price;
    }

    @Override
    public void updateStock(Integer bookId) {
        String sql = "update t_book set stock=stock-1 where book_id=?";
        jdbcTemplate.update(sql,bookId);
    }

    @Override
    public void updateUserBalance(Integer userId,Integer price) {
        String sql = "update t_user set balance=balance-? where user_id=?";
        jdbcTemplate.update(sql,price,userId);
    }
}
BookService
package com.itchen.spring.tx.service;


public interface BookService {
    void buyBook(Integer bookId, Integer userId);
}
BookServiceImpl
package com.itchen.spring.tx.service;

import com.itchen.spring.tx.dao.BookDao;
import org.springframework.beans.factory.annotation.Autowired;
import org.springframework.stereotype.Service;

@Service
public class BookServiceImpl implements BookService{
    @Autowired
    private BookDao bookDao;
    @Override
    public void buyBook(Integer bookId, Integer userId) {
        // 根据图书id查询图书的价格
        Integer price = bookDao.getBookPriceByBookId(bookId);
        // 更新图书表中的库存量
        bookDao.updateStock(bookId);
        // 更新用户余额
        bookDao.updateUserBalance(userId,price);
    }
}
TestBookTx
package com.itchen.spring.tx;

import com.itchen.spring.tx.controller.BookController;
import org.junit.jupiter.api.Test;
import org.springframework.beans.factory.annotation.Autowired;
import org.springframework.test.context.junit.jupiter.SpringJUnitConfig;

@SpringJUnitConfig(locations = "classpath:beans.xml")
public class TestBookTx {
    @Autowired
    private BookController bookController;

    @Test
    public void testBuyBook(){
        bookController.buyBook(1,1);
    }
}
分析
将买书一个方法作为一个大的方法在Controller中调用。然后再Service将这个方法分解成多个数据库操作。最后将数据库的各个操作在dao层进行实现。(揉碎了喂到嘴里)
问题:这里如果用户的余额不足,仍然会执行图书出库操作,但是应为没有事物的回滚,报错的步骤不会执行。
开启事务步骤(使用注解的方式)
- 在bean中添加:开启事务的注解驱动
- 在业务逻辑层(Service层)添加事务注解@Transactional**【这个注解可以加在方法上,也可以加在类上】**
运行结果:在用户余额不足的情况下依然报错,但是不会执行图书出库操作
事务注解的一些属性
| 参数 | 描述 |
|---|---|
| readOnly | 是否只读(表示是否只能进行查询操作) |
| timeout | 设置超时时间(-1,表示永不超时;单位是秒) |
| noRollbackFor | 事务策略(设置哪些异常不回滚) |
| (见文章头连接) | 隔离级别:解决脏读、不可重读、虚读等 |
| (见文章头连接) | 传播行为:事务之间的相互调用,使用哪一个事务进行逻辑处理 |
脏读:两个都未提交,但是都能看见对方的修改
不可重复:一个提交了,另一个修改了没有提交的能看到修改完成之后的数据
虚读:一个提交了,另一个做完了添加没有提交之后能读到自己添加的数据
Resoource资源操作
Resource接口提供了对低级资源访问的抽象方法,接口有多个实现类供给给我们来访问低级资源
UrlResource实现类访问url资源
// 演示urlResource访问网络资源
public class UrlResourceDemo {
    public static void main(String[] args) {
        // http前缀
        loadUrlResource("https://www.baidu.com/");
        // file前缀 放在项目的根路径
        loadUrlResource("file:itchen.txt");
    }
    // 访问前缀http
    public static void loadUrlResource(String path){
        // 创建Resource接口的实现类的对象
        try {
            // 获取资源
            UrlResource url = new UrlResource(path);
            System.out.println(url.getFilename());
            System.out.println(url.getURI());
            System.out.println(url.getDescription());
            System.out.println(url.getInputStream().read());
        } catch (Exception e) {
            throw new RuntimeException(e);
        }
        // 获取资源信息
    }
}
ClassPathResourceDemo访问本地资源(项目内资源)
// 访问类路径下的资源
public class ClassPathResourceDemo {

    public static void main(String[] args) {
        loadClasspathResource("itchen.txt");
    }
    public static void loadClasspathResource(String path){
        // 创建的对象
        ClassPathResource resource = new ClassPathResource(path);

        System.out.println(resource.getFilename());
        System.out.println(resource.getDescription());

        // 获取文件内容
        try {
            InputStream in = resource.getInputStream();
            byte[] b = new byte[1024];
            while(in.read(b) != -1){
                System.out.println(new String(b));
            }
        } catch (IOException e) {
            throw new RuntimeException(e);
        }
    }
}
loadAndReadUrlResource访问磁盘内文件
public class FileSystemResourceDemo {

    public static void loadAndReadUrlResource(String path) throws Exception{
        //相对路径
        FileSystemResource resource = new FileSystemResource("itchen.txt");
        //绝对路径
        //FileSystemResource resource = new FileSystemResource("D:\\itchen.txt");
        // 获取文件名
        System.out.println("resource.getFileName = " + resource.getFilename());
        // 获取文件描述
        System.out.println("resource.getDescription = "+ resource.getDescription());
        //获取文件内容
        InputStream in = resource.getInputStream();
        byte[] b = new byte[1024];
        while(in.read(b)!=-1) {
            System.out.println(new String(b));
        }
    }

    public static void main(String[] args) throws Exception {
        loadAndReadUrlResource("itchen.txt");
    }
}
其他的实现类见文档头链接
国际化:i18n
调用不同的配置文件示例
@Test
public void test1(){
    ResourceBundle bundle = ResourceBundle.getBundle("itchen", new Locale("zh", "CN"));

    String value1 = bundle.getString("test");
    System.out.println(value1);
}
@Test
public void test2() {
    ResourceBundle bundle = ResourceBundle.getBundle("itchen", new Locale("en", "GB"));

    String value1 = bundle.getString("test");
    System.out.println(value1);
}
数据校验
通过Validator接口实现数据校验
public class TestMethod1 {

    public static void main(String[] args) {
        //创建person对象
        Person person = new Person();
        person.setName("lucy");
        person.setAge(-1);

        // 创建Person对应的DataBinder
        DataBinder binder = new DataBinder(person);

        // 设置校验
        binder.setValidator(new PersonValidator());

        // 由于Person对象中的属性为空,所以校验不通过
        binder.validate();

        //输出结果
        BindingResult results = binder.getBindingResult();
        System.out.println(results.getAllErrors());
    }
}
测试:
public class PersonValidator implements Validator {

    // 校验类型确认
    @Override
    public boolean supports(Class<?> clazz) {
        return Person.class.equals(clazz);
    }

    // 校验逻辑
    @Override
    public void validate(Object object, Errors errors) {
        ValidationUtils.rejectIfEmpty(errors, "name", "name.empty");
        Person p = (Person) object;
        if (p.getAge() < 0) {
            errors.rejectValue("age", "error value < 0");
        } else if (p.getAge() > 110) {
            errors.rejectValue("age", "error value too old");
        }
    }
}
基于注解校验
基于方法校验
自定义校验
其他的实现类见文档头链接
AOT
AOT先关概念
-
JIT:动态编译,边运行边编译
-
AOT:运行前编译,提前编译